apologies to you all, as i know i've been on the run for quite some time now. i guess i just panicked. got a bit lost. didn't know whether to continue, or what to continue with. do i want to continue? do i have time for this? everything just got a bit much.
but i'm thinking of maybe coming back. if you'd still have me that is. i know i was pretty selfish to run away, but if you'll accept my apology, maybe i'll organise some super stuff for this blog. i'll make it up to you guys, i promise.
i need to get back in the groove.
on a side note, it was such a pleasant surprise logging back in to see a lovely message from amy from 'amy grace' blog who had nominated little old me (yes, i was surprised too) for a liebster bloggers award. unfortunately because i was in the middle of playing hide and seek, i missed out but when people say 'it's the thought that counts', this was definitely one of those glorious moments. so thankyou amy, you may just have convinced me to sit at this keyboard once again.

Wednesday, September 11, 2013
Thursday, June 20, 2013
product review: lush 'sunny side' bubble bar.

first up for review is the last product i picked up as i was approaching the counter. i'll be honest, the only reason i picked it up is because it was glittery. as in completely covered in glitter. as in gold glitter. so quite obviously, i had to have it.

^ photo property of lush cosmetics (i forgot to take my own beforehand).
anyway the idea is you basically place it under the running bath water for a minute or two until the bath bubbles up. as the bubble bar is yellow, honestly it kind of makes the actual water look like someone peed in the bath (i assure you i didn't). but otherwise it just creates some bubbles like bubble bath would and the gold glitter sits throughout the bath. smell wise, it was a bit sweet. it's not really something i would rush out to buy again but if i was there and had some spare change, i'd get it solely for the glitter factor. plus playing with the glitter kept my childish mind entertained.

the aftermath. the bath definately needed a wipedown.
next up from lush i'll be reviewing their 'rub rub body scrub' so stay tuned.
much love! x
Thursday, June 6, 2013
i am loving: embracing the winter chill.

first off, i just wanted to apologise for the late blog post. i've had a horrible cold recently and haven't had the energy to do much at all, let alone write a snazzy blog post. but we can now praise the lord, as the drugs are starting to kick in and i'm finally on the mend.
now in australia we're already a third of the way through winter if you work the seasons by months. however in hobart, it's only just now that you can really start to feel the harsh kick of icy coldness that is now throughout the air. that crisp air that sometimes hurts a little if you breathe it in too far, that swirls around your exposed fingertips and the tip of your nose turning them into pink little ice blocks and sometimes even from the inside of your house, turns each breathe into a visible white mist. i must say, i am loving it. and because of this i'm writing a little list of things i'm excited for with thanks to this cold weather hit (inspired by the gorgeous louise from sprinkle of glitter).
stormy nights in bed: where the rain patters on the roof while you're curled up inside with a hot water bottle and a good book (perhaps also snuggled up with your other half).
a snow adventure to mount wellington: one of the only places high enough above sea level where snow actually settles. not only allowing one to enjoy some fun in the snow but also a pretty spectacular and peaceful view.
tummy warming drinks: especially when it is super cold and you can literally feel them warming you up from the inside, out.
layers: jumpers upon jackets upon leggings upon wooly socks. as long as i'm cosy warm, bring on the wooly mammoth look.
hearty meals: the ones that make you feel so satisfied, you've no choice but to spend hours on the couch afterwards in a food coma.
coats: i've slowly fallen in love with investing in timeless coats and this weather is only a perfect excuse to add to the collection.
crafts: indoors time means plenty of craft time in any way, shape and form. hand me the knitting needles and a paint brush and i'm likely to be amused for hours.
my birthday: after a series of unfortunate events on my few previous birthdays, the day is no longer something i enjoy. however this year it means my boyfriend is on uni holidays which means more 'us' time and i'm thoroughly looking forward to it.
pj days: enough said. pjs, all day.
beanies: i am in love with beanies at the moment. not only are they perfect to disguise a bad hair day, but practical in the cooler months too.
movie nights: snuggling under a giant blanket with a movie and some popcorn on the side. i think i'd be rather content.
i'm sure in a few months time i'll be saying bring on the warmer weather, but for now i'm quite happy to embrace what the cold has to offer. is there anything you guys love about winter? let me know, below.
also, it's also good to remember that while we get to snuggle up in warm beds when it's freezing outside, a staggering number of us don't. so donate a blanket, jacket or socks to your local charity this winter. not only will it leave the person who receives it feeling toasty on the outside, but i guarantee you'll get a fuzzy feeling on the inside too.
stay warm!
love, t&e.
*the photo used in this post does not belong to / was not taken by me.
Saturday, May 25, 2013
diy: coffee cup for the glitter obsessed.

it suddenly occured to me, i haven't yet blogged a 'diy' yet, so for my first diy i thought i'd just do something nice and easy that's just five simple steps.
now i did do this diy before i started blogging, therefore i don't have any 'during' shots but a while ago my mum bought me a cute take-away coffee cup with a paper paris themed picture on the inside. after using it for a while my dad put it through the dishwasher and of course, it leaked through and stained all the paper. i still wanted to use the cup and had seen a few pictures of glitter take-away coffee cups online so decided, now that the picture was ruined, i may as well give my own glitter coffee cup a whirl. although i did see other posts on the net, i pretty much just made my diy up.
you'll need:
- take-away coffee cup (example of what type is below)
- glitter in your choice of colour (larger glitter flakes work better for this project)
- glue (mod podge glue is amazing for this)
- smallish paint brush
- container or bowl to catch excess glitter (& newspaper if you're likely to be a little messy)
note: the kind of coffee cup you'll need will be able to unscrew from the bottom and will have an inside and outside layer. the outside layer should obviously be clear plastic so you can see the glitter.

step one: take apart your coffee cup like above ^. on the clear section paint a layer with your paint brush over half the cup with the glue and quickly sprinkle a generous amount of glitter into the cup. roll the cup from side to side so the glitter spreads across the glue but if you have a hole in the bottom from where the two layers connect, be mindful glitter doesn't fall out the bottom. feel free to lightly pat the glitter down into place too. tip any excess glitter into the spare bowl or container.
step two: repeat the above on the other half of the coffee cup. you can use any excess glitter you may have tipped out before, on the other half of the cup. you'll notice the glue will be very white, but it will dry completely clear so don't worry if the outside looks more white than glittery.
step three: continue applying the glitter, alternating between the two halves until there is a nice layer covering on the inside. make sure the layers aren't too thick however, or the inside part of the cup will not fit back into place. any tiny gaps between the glitter won't matter too much as once it's dry you generally won't notice them and if you do, you can always fix them later.
step four: if you want, once the glue has dried for about half an hour you can gently paint one last layer of glue over the entire inside of the cup, just to seal the glitter in place. you don't have to do this, but i did, just to prevent the glitter from shedding over time.

step five: now you just have to wait for your cup to dry! as i said, it may look very white from the outside because of the glue but the white will become clear once it's dry. if you've missed any spots, you can just go back over them with a little more glue and glitter. screw the two sections back together and you're ready to have your coffee on the go.
and TA-DA! you're very own glittery coffee cup. i'm so glad i did this diy as it looks so effective once you're done. just note that you can't put the whole thing in the dishwasher (although you can't with most of these types of cups anyway). if you want to try and put it in the dishwasher however, you'll be best to unscrew the two parts and put the non-glitter half in there on it's own.

let me know if anyone gives this a whirl and what you think of this diy.
cheers, x
cheers, x
Thursday, May 16, 2013
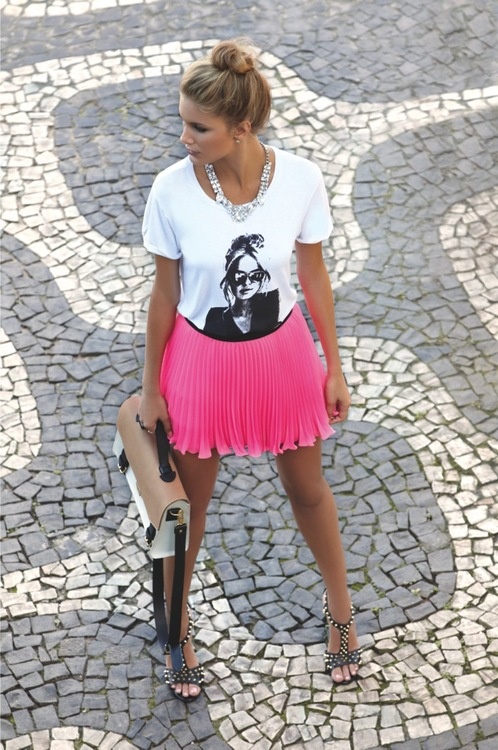
current fashion crush: scolding hot pink.
sometimes i follow trends, sometimes i don't. more accurately, sometimes i like things when they happen to be in trend, and the rest of the time i just like whatever the hell i like.
i never used to be a pink girl, however if you showered me right now with all things 'legally blonde pink,' i'd be the happiest girl alive.


Monday, May 6, 2013
fashion haul: topshop.


yippeee, my top shop delivery has finally arrived.
thought you guys might want to have a quick squiz at what i got, incase you take fancy to any of the items.
it basically all started with me wanting a beanie, but then i thought i might get a few other goodies and got sucked in to the free delivery for spending £50. i ended up with two beanies, a cropped top, cropped jumper and two pairs of socks.
colour block skater beanie: £10
i loved the splash of pink seeing as this style of beanie usually has more of a grunge and boyish look. looking forward to figuring out how to style this beanie as i'm not quite sure what i'm going to wear it with or how to wear it on my smallish head. this was the original item i jumped on topshop to get before i ended up with the following.
snow faux fur teacosy beanie: £7 (on sale)
the second beanie was a gamble. on my trip to europe a few months ago, i saw some super cute faux fur head gear so when i spied this, i thought this might be exactly what i was looking for. it was hard to tell through just the photo how big the beanie was and how exactly it would fit but for the price, i was willing to try it out. it came in black and cream but i thought the cream was a bit different. so glad i picked this, it's the cosiest thing ever!
dweeb crop top: £7 (on sale)
i thought this top was nice and plain which means i could dress it up or down depending on what i'm wearing. i love a plain top with a bold 'statement'. they always look effective.
mickey mouse crop sweater: £22
this one was a little more expensive but i have a slight obsession with anything mickey mouse, so i was willing to spend a little extra cash. i liked that it was cropped, as it makes it different and easier to style as it's not so bulky so you could pair it with anything highwasted. the bottom is a chopped off style without stitching which i didn't originally realise but i think it adds something to it.
ankle socks (cat and polka dots with lace): £3.50 each
i pretty much bought these to get me over the £50 mark because all the other items i wanted would have made it the equivalent of paying postage and i didn't really have the money to be buying things in the first place. i'd really wanted the cat socks for a while anyway and the polka dot ones would be really cute on a day when i'm feeling a little more girly.
so receiving my delivery today has made me super excited to start styling some of these pieces as the cuts and styles of them make them a little bit different to things i might normally wear.
have you bought anything online recently that you've been wearing a lot? let me know.
have a fabulous week,
cheers!
Friday, May 3, 2013
product review: products from sos emergency hand rescue.

howdy guys.
so after a pretty shit and stressful few weeks, i'm back with a quick product review using some goodies i suggested in the 'sos: emergency hand rescue'.
l'occitane on minute hand scrub:
for about $30 bucks, you can pick up a 100ml tub of this stuff. it's basically an oil with organic brown exfoliating sugar. the oil aims to nourish the hands and contains shea while the exfoliating sugar gently scrubs away any dead skin cells. after a little scrubbing, your paws will be feeling pretty damn smooth, however occasionally the oil really likes to do its job (at being oily) and requires a some soap to encourage it to wash away. this stuff doesn't smell the best either, but overall as a hand scrub, it does its job pretty well so it's good for a quick treatment every so often. you'll have hands as soft as a baby's bum in just over a minute.
l'occitane shea butter hand cream:
the 150ml size of this is about $40 bucks, which is a decent price. the cream itself is a best seller (one is sold every 3 seconds) and i can see why. it's super great for nourishing and protecting the hands from becoming dry and contains 20% shea butter. shea butter is basically a complex fat that is sourced from the nut of a shea tree and is used throughout many cosmetic labels thanks to its properties in moisturising, healing and renewal processes. for these reasons, it is found in a lot of l'occitane products. once thoroughly rubbed in, the cream is not oily or greasy and thanks to it's very subtle and almost non-existent scent, it's great for those who don't like or can't use scented creams. i use this every night before bed and i love it!
butter london: horse power - nail fertiliser:
for best results it is directed that you apply one coat everyday for a week, then remove and repeat for the duration of a month, with a months break in between each cycle. i have to admit, i rarely do this for the full month but i find it good for giving my extremely weak nails a bit of extra oomph when i'm trying to encourage them to grow and i also love using it as a basecoat when i'm applying colour to my nails. i picked up my 17.5ml polish for about $25 so it's not extremely cheap but so far, it seems like a little product goes a long way, so it probably works out well in the long run.
sorry again for my brief break, but i'm back and ready to blog.
do you guys have any nail products that you love? let me know, i love trying out new ones.
cheers, x
Subscribe to:
Posts (Atom)